
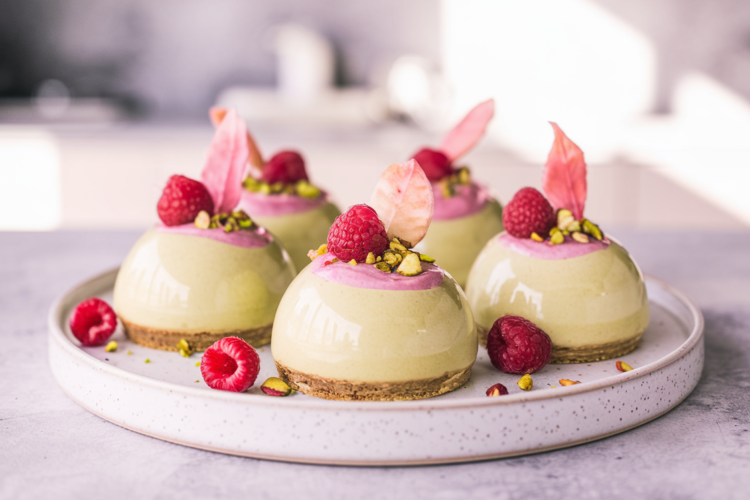
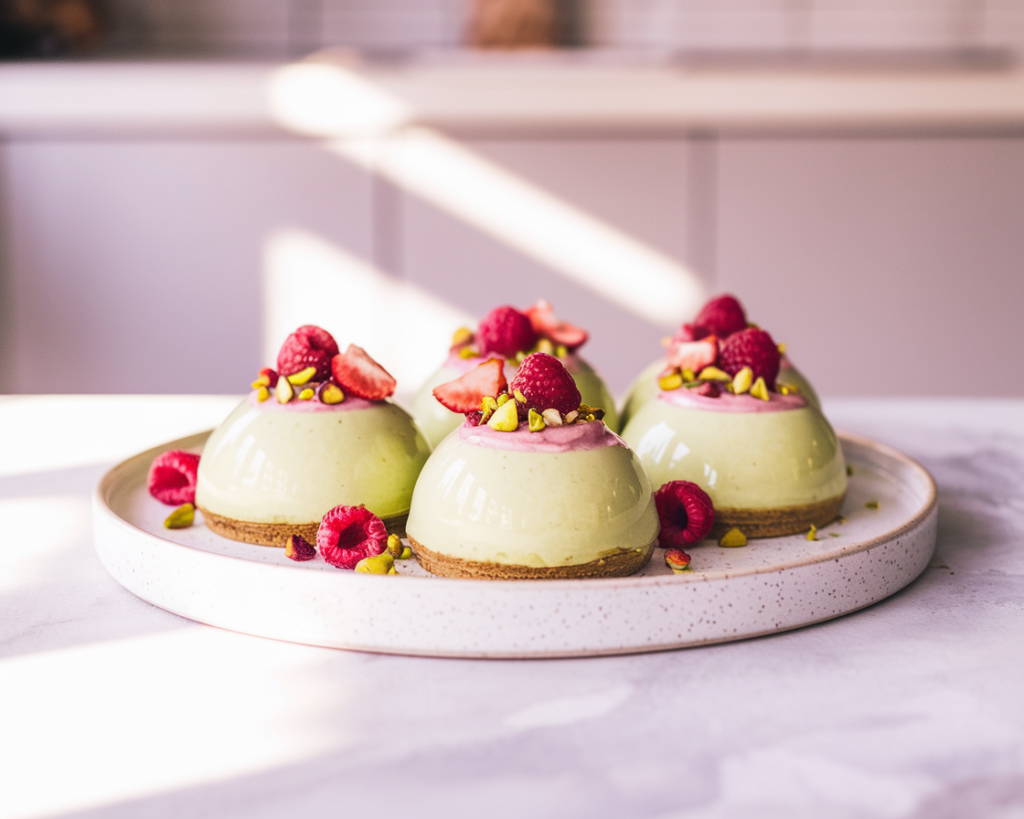
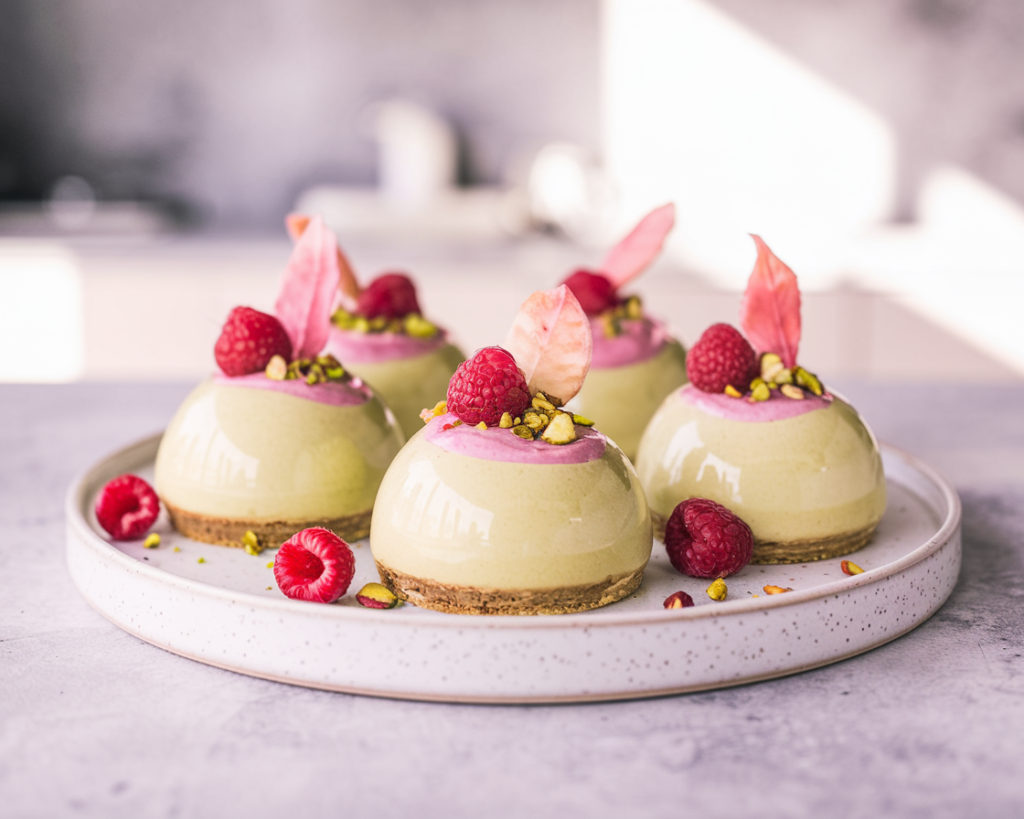
I recall attending a springtime brunch party and spotting these gorgeous dome shaped desserts, each a sweet surprise, blending tangy fruit and luscious cheese. After my first taste of pistachio and raspberry in one mouthful, I was instantly drawn in by the color contrast: soft green from the nuts and bright pink from the berries. Over time, I tried my hand at recreating them at home, aiming for a recipe that delivers the same impressive look and mouthfeel but stays gentler on my daily sugar and fat intake. These Pistachio & Raspberry Cheesecake Domes strike that balance, offering a creamy interior and refreshing fruit center, all while cutting back on refined sugars and heavier ingredients.
Why a Healthier Pistachio & Raspberry Dome?
- Lower Sugar and Fats: By blending reduced fat cream cheese with Greek yogurt and mindful sweeteners, you get a lighter cheesecake texture that’s still satisfyingly rich.
- Fruity Elegance: Raspberries provide a natural, tangy sweetness and vibrant color, pairing beautifully with pistachios’ mild nuttiness.
- Portion Control: Making individual domes helps curb overindulgence, just enjoy one portion at a time.
- Wow Factor: Despite the healthier spin, these domes remain visually appealing, perfect for parties or a special dinner.
Prep Time, Chill Time, Approx. Calories, and Servings
- Prep Time: 40 minutes (plus cooling and assembly)
- Chill Time: 3+ hours (to set)
- Calories: ~250 per dome (approximate)
- Servings: 6-8 domes
Step-by-Step Guide to a Lighter Pistachio & Raspberry Cheesecake Dome
1. Craft a Simple Base
If you want a subtle crust or base for each dome, crush a combination of pistachios and whole grain crackers (or a few crispy cereal flakes) in a small bowl. Stir in a little melted light butter (or a tiny drizzle of coconut oil) and a pinch of sweetener. Press a spoonful of this mixture into silicone dome molds (or small ramekins), forming a thin bottom layer. Set them aside or pop them in the freezer to firm up while you prepare the filling.
Pitfall Alert: Keep the base layer thin. Overly thick crust can overshadow the delicate cheesecake and fruit flavors.
2. Whip Up a Reduced-Fat Pistachio Filling
In a mixing bowl, blend reduced fat cream cheese with a small amount of Greek yogurt for extra protein. Add a gentle sweetener coconut sugar, stevia, or monk fruit can all work well, until it tastes mildly sweet without being overwhelming. If you have unsweetened pistachio paste or finely ground pistachios, fold in a few spoonfuls for authentic flavor and a light green hue. You might add a couple of drops of natural food coloring if you want a brighter tone, but it’s optional.
Personal Tip: For an ultra smooth consistency, beat everything with an electric mixer on low speed. Overmixing can introduce air bubbles and hamper the final look.
3. Create a Raspberry Core
Set aside half your cheesecake mixture. Puree a handful of fresh or thawed frozen raspberries with a small drizzle of sweetener if needed. Gently fold this puree into the reserved filling to create a pink, fruity layer. Alternatively, you can keep the raspberry puree separate, spooning a small portion into each dome for a more dramatic swirl of color inside.
Flavor Variation: If you love tanginess, add a teaspoon of lemon juice or zest to the raspberry portion for a refreshing zing.
4. Fill and Layer the Domes
Now comes the fun part: layering. Spoon or pipe a small amount of the pistachio cheesecake mixture into the dome molds on top of the chilled crust. If you have separate raspberry filling, add a spoonful in the center of each dome. Top with more pistachio mixture until nearly full. Smooth the surface with a small spatula. If you combined everything for a single swirl effect, simply fill each mold, leaving a bit of space at the top.
Pitfall Alert: Avoid overfilling, especially if your molds have a specific capacity. A slight gap at the top can help with neat unmolding later.
5. Chill to Set
Cover or place the molds on a tray, then transfer them to the fridge for at least 3 hours. Overnight is often best to ensure the domes firm up thoroughly. If you’re short on time, the freezer can accelerate the process, but watch carefully freezing too hard can alter the creamy texture.
6. Unmold and Garnish
Once fully set, carefully pop each dome out of the mold. If they resist, run the exterior of the mold under warm water for a few seconds, or use a gentle push from the bottom. Place the domes on a serving plate.
For a finishing flourish, drizzle a bit of pistachio paste on top, or sprinkle chopped pistachios. You can also garnish with a few fresh raspberries for an eye catching color contrast.
Serving Note: A quick dusting of cocoa powder or a swirl of melted sugar free chocolate can add an extra treat factor without large calorie boosts.
Nutrition Snapshot
Each dome generally rests around 250 calories, subject to brand and portion choices. Expect about:
- Carbs: ~15-18g (pistachios, sweeteners, raspberries)
- Protein: ~8-10g (cream cheese plus Greek yogurt)
- Fats: ~14-16g (from nuts and dairy)
- Fiber: ~3-4g (pistachios and raspberries)
These figures help keep each serving moderate while still feeling indulgent.
Tips for Storage & Leftovers
- Refrigeration: Store leftover domes in an airtight container in the fridge for up to 3 days.
- Freezing: Wrap each dome individually in plastic wrap, then freeze in a sealed container for up to 2 weeks. Thaw overnight in the fridge.
- Make Ahead: If preparing for an event, you can complete all steps except unmolding one day prior, just decorate right before serving.
Personal Variations
- Chocolate Spin: Incorporate a teaspoon of unsweetened cocoa powder into part of the cheesecake mixture for a chocolate pistachio swirl.
- Citrus Lift: Mix in a little lemon zest or orange zest for a bright complement to the nutty base.
- Berry Blend: Swap some raspberries for strawberries or blackberries if you prefer varied flavors.
Pairing Suggestions
- Fruit Platter: Enhance the freshness by arranging sliced kiwi, orange wedges, or grapes next to each dome.
- Tea or Coffee: A gentle herbal tea or a simple black coffee can contrast nicely with the dessert’s sweetness.
- After a Light Main: Serve after a crisp salad or grilled veggies to keep the meal balanced and refreshing.
Final Thoughts
If you’re looking for a dessert that showcases the subtle sweetness of pistachios and the bright tang of raspberries while maintaining a lighter nutritional profile, these Pistachio & Raspberry Cheesecake Domes might be the perfect fit. They look stunning on a plate, highlight natural colors, and deliver a creamy texture reminiscent of classic cheesecake, only with an updated approach to sugar and fat. Feel free to pin or bookmark this recipe, and treat yourself or your guests to a visually striking dessert that doesn’t overwhelm your meal plan.
Pistachio & Raspberry Cheesecake Domes
Course: DessertCuisine: ModernDifficulty: Intermediate6-8
servings40
minutes250
kcal3
hoursFollow us on Pinterest! 🙂
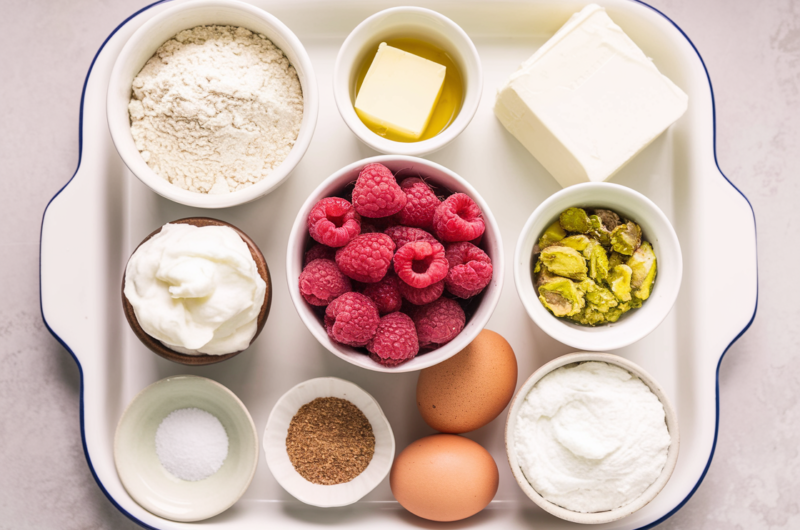
Ingredients
Almond Flour (½ cup) 🌰
Ground Pistachios (½ cup) 🌿
Light Butter or Coconut Oil (2 tablespoons, melted) 🧈
Reduced Fat Cream Cheese (12-16 ounces) 🧀
Greek Yogurt (¼-½ cup) 🥛
Sweetener of Choice (⅓ cup, e.g., monk fruit, stevia, or coconut sugar) 🍯
Raspberries (1 cup, fresh or thawed) 🍓
Optional Unsweetened Pistachio Paste (1-2 tablespoons) 🌱
Eggs or Egg Whites (2, if using a baked approach-optional) 🥚
Pinch of Salt 🧂
Directions
- Enjoy the nutty fruity blend of pistachios and raspberries in a dome that’s as beautiful as it is balanced, perfect for refreshing any dessert spread!
Notes
- Chilling Tip: For perfect dome shapes, chill your cheesecake domes overnight for a firm, smooth texture before glazing or serving.
- Flavor Variation: Swap raspberries with strawberries or blackberries for a delightful twist, enhancing the fruity contrast against the nutty pistachio base.
